
Excel is among the core Microsoft Office applications. It is the quintessential tool for organizing, formatting, and calculating data. You don’t have to be “a math person” to navigate and use excel.
We want to show you how user-friendly and handy Excel can be! Here are the first 5 excel tips and tricks in our series to gain confidence in using this program to your advantage.
1. Try A Template
Excel offers a whole slew of pre-formatted templates to save you time and energy. When you know what you need to get done, but you’re not sure how to set up your spreadsheet or you don’t have the propensity to do so, start with a template and all that will be left to do is make a few tweaks and get your data in there. When you open Excel you can choose a template from the main menu before starting your new document.
2. Count and Sum Functions
COUNT the number of cells you highlight. Below, the function would result in cell A7 containing “5” since we highlighted 5 cells.
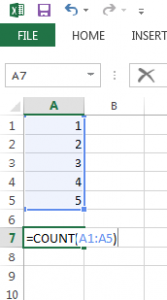
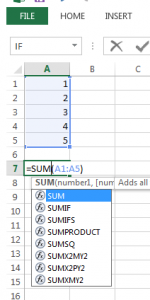
SUM allows you to add up the numbers in each of the cells you highlight for a total. Below, the function would result in cell A7 containing “15” since we highlighted cells containing 1, 2, 3, 4, and 5 and this added them together.
3. Use Keyboard Shortcuts
Instead of dropping your hand from the keyboard to find your mouse and then searching around, you can use keyboard shortcuts to swiftly execute commands in Excel. There are numerous resources for printable versions like this one for you to keep handy. You didn’t think we expected you to memorize these right away, did you?!
- Note: Many shortcuts are applicable across Microsoft Office applications!
4. Auto-Fill
Move your cursor to the lower right corner of a cell that comes before blank cells in a row or column. This corner of the populated cell is called the “fill handle”. It will turn into a plus sign (+) and from there you can click it and drag the mouse down or across as far as you’d like to fill the boxes in between with whatever was in the cell you selected.
Once you get good at this you can start to use an auto-fill menu that will intelligently guess how you might like to auto-fill the coming spaces based on what came before the cell you’ve clicked (+).
5. Insert New Rows or Columns
Ready for the next 5 tips? Check out Part II
Skip ahead to… Part III for tips 10-15
Skip WAY ahead to… Part IV for tips 16-20
We want to hear from you. What questions can we answer? What challenges are you looking to address for your business or yourself professionally?
Oops! We could not locate your form.